
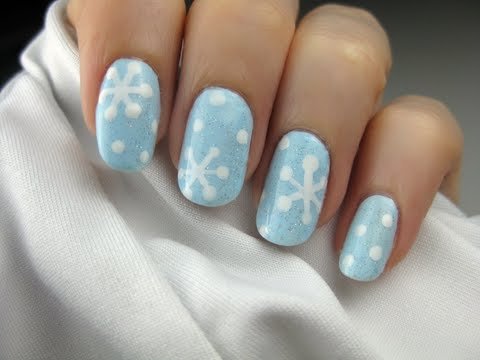
When it comes to Christmas nail designs, one idea that never goes out of style is snowflakes. Snowflakes are the epitome of winter and can instantly give your nails a frosty and festive look. Plus, they’re easy to do, making them perfect for a last-minute holiday party or just adding a touch of winter magic to your everyday look.
To achieve the snowflake nail design, start by prepping your nails as you would for any other manicure. Trim, shape, and buff your nails to your desired length and shape. Then, apply a base coat to protect your nails and create a smooth surface for the nail polish. Once the base coat is dry, it’s time to add the snowflakes!
You can create snowflakes using different techniques. One option is to use a nail stamping kit. Nail stamping kits typically come with a stamping plate that has various snowflake designs and a stamper to transfer the design onto your nails. Simply choose your desired snowflake design, apply a white or silver nail polish to the design on the stamping plate, and use the stamper to press the design onto your nails. It’s a quick and easy way to get perfectly shaped snowflakes on your nails.
If you don’t have a nail stamping kit, you can still create snowflakes using a nail art brush or a toothpick. Start by applying a white or silver nail polish as your base color. Once the base color is dry, dip your nail art brush or toothpick into a contrasting color, such as blue or silver, and create small lines and dots on your nails to mimic the intricate patterns of snowflakes. Remember, snowflakes are unique and asymmetrical, so don’t worry about making them perfect. The imperfections will add to the charm of the design!
If you want to take your snowflake nail design to the next level, you can add some sparkle and shine. Apply a top coat with glitter or a holographic finish to give your nails a wintery sparkle. You can also use a fine-tipped nail art brush to add some silver or gold accents to your snowflakes. Just dip the brush into the polish and lightly brush it over the lines and dots you created to add some dimension and shimmer to your snowflakes.
To finish off your snowflake nail design, apply a top coat to seal in the design and add shine. Not only will this protect your snowflakes from chipping, but it will also give your nails a professional and polished look.
Whether you’re celebrating the holiday season or simply love the beauty of winter, snowflake nails are a fun and festive way to show off your holiday spirit. Plus, with these easy-to-do techniques, you can have snowflakes falling on your nails in no time! So grab your nail polish and get creative with this winter wonderland nail design.